
Do you do activities for Easter? Do you celebrate Easter?
Generally, because we aren't church going (apart from Nienna) we don't do much at all beyondstashing eggs giving the kids eggs.
This year we planned an egg decorating activity with our home ed group. this activity spans two weeks so you will have to check back again next week to see what happens in part two.
Because we had so much fun at the group we decided to play at home again on Friday and I took the time to take some pictures and do a bit of a tutorial.
What you will need:
food colour
vinegar
water
skewers or toothpick
sewing pin
candles
matches
paper towel
3 shallow containers
shallow tray or flat lid for working on
Eggs either hard-boiled eggs or blown eggs. The latter is ok for older children.

For tie-dyed eggs


Wax and dye eggs


Generally, because we aren't church going (apart from Nienna) we don't do much at all beyond
This year we planned an egg decorating activity with our home ed group. this activity spans two weeks so you will have to check back again next week to see what happens in part two.
Because we had so much fun at the group we decided to play at home again on Friday and I took the time to take some pictures and do a bit of a tutorial.
What you will need:
food colour
vinegar
water
skewers or toothpick
sewing pin
candles
matches
paper towel
3 shallow containers
shallow tray or flat lid for working on
Eggs either hard-boiled eggs or blown eggs. The latter is ok for older children.
- To blow the egg you need to give it a really good shake first, this breaks up the membranes and makes it easier to blow.
- Next take a sewing pin and gently push a small hole in the top and bottom of the egg. Then take a toothpick or skewer and gently enlarge the hole.
- Over a small bowl blow into one end of the egg until all the egg has blown out into the bowl. Give the inside a rinse and set aside to dry.
For easy handling I put a skewer through the blown eggs and secured with a bit of blue (pink) tac. Put these aside for wax decorating.

For tie-dyed eggs
You will need vinegar and I think white works best, however I only had brown for this example.

water

I used the lid of a large plastic tub but any shallow container to sit your work on will do. You then lay gladwrap, or because I don't use it I cut a plastic bag in half and laid that down.

Soak a piece of paper towel in water and then squeeze about half the water out, lay out flat and sprinkle with vinegar. I think you could actually put the vinegar in the water and save yourself a step.
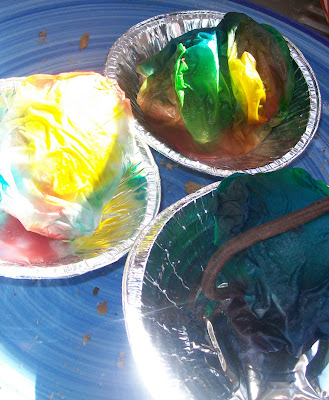
Now for the fun part of adding colour. Either use those small squeeze bottles of food dye or use droppers and put your colours on the paper towel. I suggest a maximum of three drops of three different colours, otherwise you will end up with a messy brown egg.

Place the eggs in the middle of the paper and wrap it up. Place it somewhere in the sun and leave for a few hours. Unwrap and leave to dry off.

Wax and dye eggs
Take your eggs on the skewers and drip candle wax on them. You can try a design or just do random drops.

In a shallow container put water and food dye of your choice. Remove eggs from the skewers and place in dye, leave to soak for at least 15 min on each side.

Then place in hot oven on paper towel to melt the wax off

Once the wax has gone and the eggs have cooled a bit place them in your next colour then repeat the process.
You can be as fancy as you want and create patterns of colour by controlling where you put the wax.

The end results are lovely and unique.
These are the ones we did at home.

These are some of the eggs we did at home ed group. The silver and glittery ones were done by Beren and Nienna and are simply painted on with acrylic paint and glitter glue.
The front middle one is one I did by drawing on the egg in bees wax crayon and then soaking in a dye bath. The front left is one Nienna did using the tie-dye method.

Next week we will finish these off with beads, ribbons and other adornments to hang from our season tree.
1 comment:
Thought I would return the favour and drop in and am so glad I did. Those eggs look amazing!! And I remember in my dim dark past that it was fun too.
Post a Comment